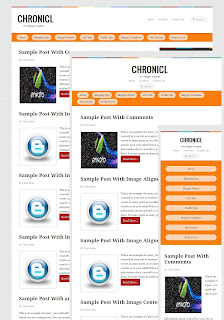
Blogger Template : Chronicl - Free Responsive Blogger Template
Blogger Template
Chronicl Free Responsive Blogger Template. This is a thesis skin which was designed by Alex from kolakube.com and I converted it to blogger template. This is a Responsive blogger template and this template has some inbuilt features such as Email subscription widget, search bar, customized heading tags (h1 to h6),code view and custom css3 buttons in three different sizes. I have focused on each and every small elements and Designed it specially.
Demo
http://chronicl-blogger-template.blogspot.in/
Licence
http://www.blogtipsntricks.com/2012/07/chronicl-responsive-blogger-template.html
Download
http://www.mediafire.com/?4qnjnfjx4iq2dpp
http://dl-1.one2up.com/onetwo/content/2012/10/17/ff195f272de9cd6e4f7658743025ce4f.zip
http://dl-1.one2up.com/onetwo/content/2012/10/17/ff195f272de9cd6e4f7658743025ce4f.zip
The main Features of chronicl Blogger Template
- Nice and Simple Design
- Responsive theme
- SEO Optimized
- 4 Column Footer Widgets
- 2 Navigation Menus
- Search bar
- Custom About me widget
- Page navigation Widget
- Stunning Threaded Comments Section
- Default Jump Breaks for Post excerpts
- Custom Email subscription widget
- Customized heading tags (h1 to h6)
- HTML Code view
- Custom css3 buttons in three different sizes
How to Upload the Blogger Template
Old Dashboard
- Go to Blogger Dashboard > Design tab > Edit HTML tab
- Click on Download Full Template to backup your Old template for safety
- Click the Browse button and locate chronicl blogger template
- Click on the Upload Button. And you are Done!
New Dashboard
- Go to Blogger Dashboard > Locate your Blog if you have more then one blog.
- Click on More Options Drop Down and choose Template
- Click on the Backup/Restore button on Top Right Corner
- Click on Download Full Template button to backup your Old template for safety
- Click the Browse button and locate chronicl blogger template
- Click on the Upload Button. And you are Done!
Customization
Basic Steps : These are basic steps you need to follow for each customization.
- On New Blogger Dashboard Go to Template > Edit HTML Button
- Ignore the Warning and Click the Proceed button
- Check/Tick the Expand Widget Template checkbox
Customize the Main Menu
Search for the Following Code<!-- Main Menu -->
After that you will see a Link list items Customize it your own
Customize the Top Menu
Search for the Following Code<!-- Top Menu -->
After that you will see a Link list items Customize it your own
Customize Feedburner Email form
- Search for <!-- Subscribe widget --> code
- After that you will see the codes email form. In the form change the chandeepsblogtips feedburner Id in Two places.
" The username for your feed can be found at the end of your feed URL.For example our feedburner URL is http://feeds.feedburner.com/chandeepsblogtips , with chandeepsblogtips as the username."
Adding Custom CSS3 Buttons
You can add custom css3 buttons in three different sizes. To add it copy the button codes as per your need.Code for Big size Buttons:-
<div style="text-align: center;">
<a class="button green big" href="YOUR_LINK">Button text</a> </div>
Code for Medium size Buttons:-
<div style="text-align: center;">
<a class="button green medium" href="YOUR_LINK">Button text</a></div>
Code for Small size Buttons:-
<div style="text-align: center;">
<a class="button green small" href="YOUR_LINK">Button text</a></div>
Now paste the code where you want to add the button and Replace the highlighted code with your link and button text.
Terms and Conditions
Please follow our four simple terms and conditions before using this template. :)- You can Use this Template for Personal and Commercial Use.
- You must keep the Footer links Intact.
- Please Don't Re-Distribute or host this Template any where!
- If you like the Template then Please Feel free to Share it!

No comments:
Post a Comment